Overview
The internet is full of ads these days, and the pihole is a fantastic way to block all these ads in a configurable manner. Not everyone has a spare Raspberry Pi laying around, but some of folks do have a server with docker installed.
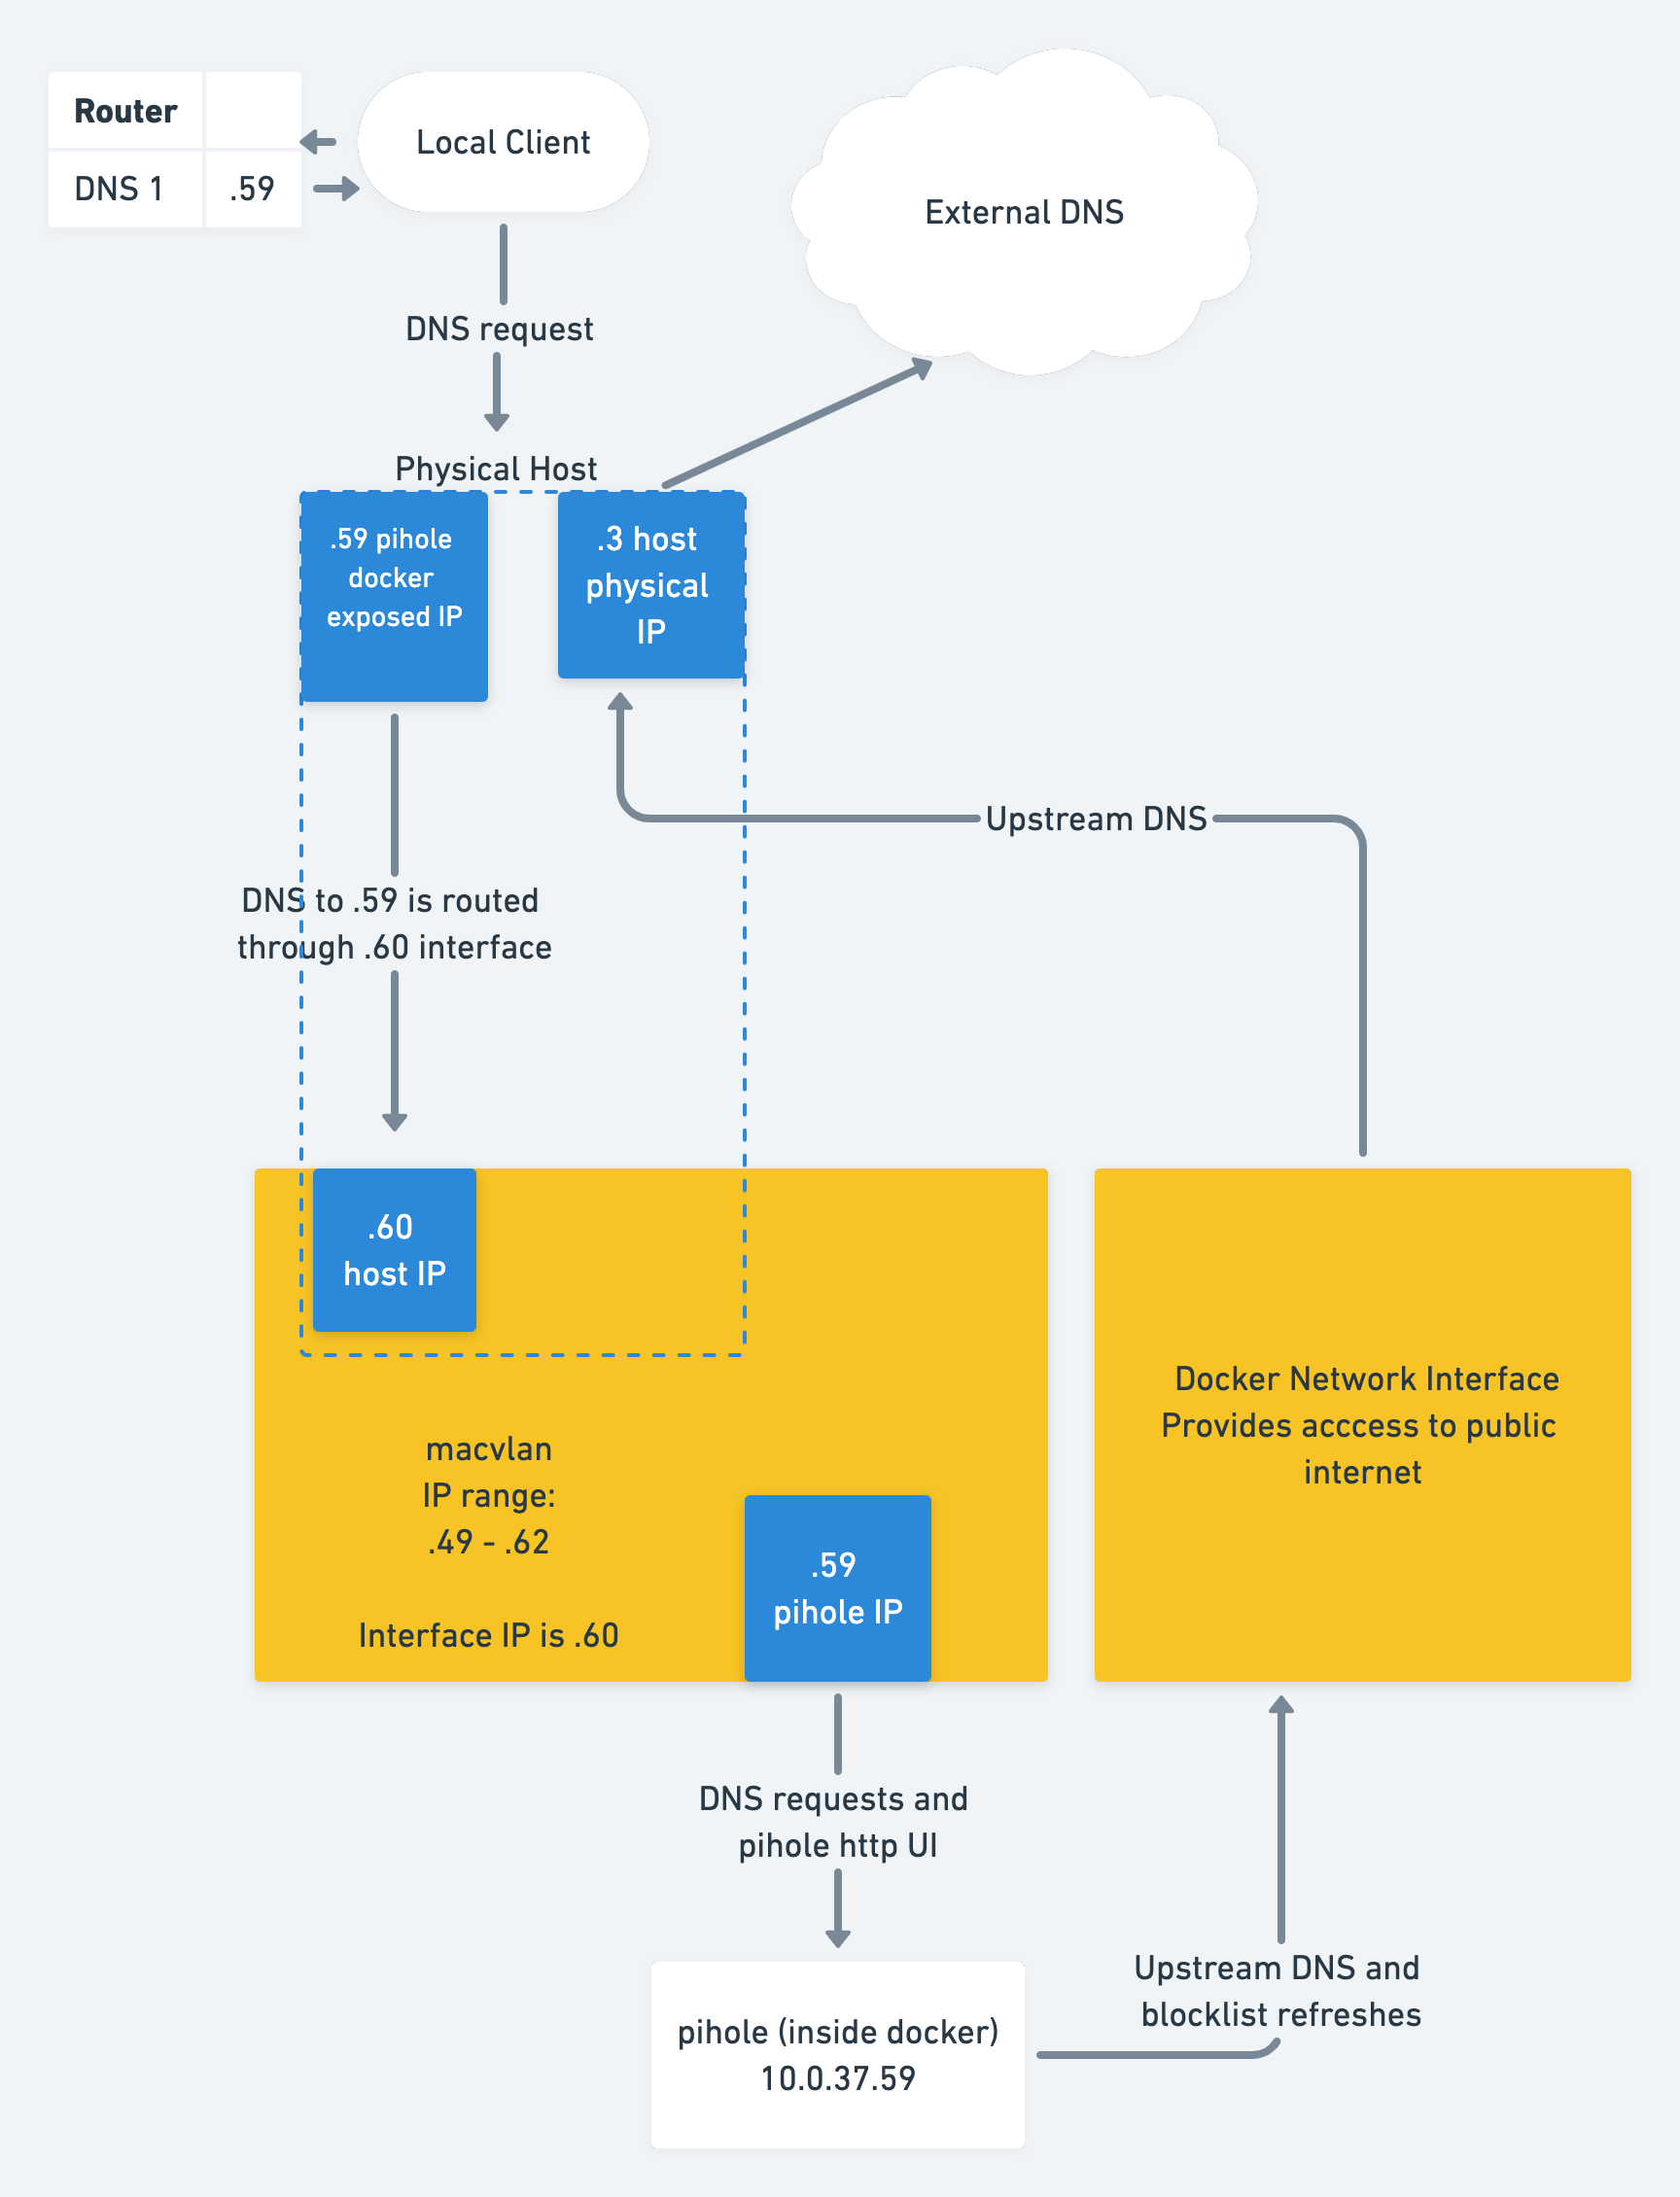
This blog post will showcase some really neat tricks using Docker's Macvlan networks and linux networking to create a pihole instance that's attached to your local network.
The final result will be a pihole docker container running with a dedicated IP, exposed to your local network. This will allow all clients to use it as a DNS server, and enable pretty usage graphs and client breakdowns in your pihole admin panel.
Requirements
In order to get the most value out of this article, you will need:
- A linux server running docker.
- Familiarity with the command line.
If you need to install docker, see the DigitalOcean article or use this ansible role.
Overview
We are going to set up a pihole docker instance using docker-compose, and then create a virtual network interface on your linux system that is bridged using macvlan.
Set up the PiHole docker-compose file
Create a directory called docker in a convenient place on your server. This will host all of your docker files in the future. Let's start a new project under the docker/pihole directory.
Open a docker-compose.yml file and paste in the following contents:
version: '2'

services:
  pihole:
    container_name: pihole-vlan
    image: pihole/pihole:v5.0 # check the latest version on docker hub.
    hostname: pihole # set an easy hostname to remember
    domainname: exampledomain # your local domain name
    mac_address: de:ad:be:ef:ff:01 # can change or leave this
    cap_add:
      - NET_ADMIN
    networks:
      macvlan0: # same as network specified below
        ipv4_address: 10.0.37.59 # the IP of the pihole container
    dns:
      - 127.0.0.1 # use local DNS, since the pihole
      - 1.1.1.1 # optional fallback DNS
    ports: # expose all pihole ports.
      - 443/tcp
      - 53/tcp
      - 53/udp
      - 67/udp
      - 80/tcp
    volumes: # mount our data volumes.
       - './etc-pihole/:/etc/pihole/'
       - './etc-dnsmasq.d/:/etc/dnsmasq.d/'
       - './backups/:/backups/' # backups explained later
    environment: # set variables for pihole configuration.
      ServerIP: 10.0.37.59 # must match ipv4_address above
      VIRTUAL_HOST: pihole.exampledomain  # Must be hostname + domainname from above
      WEBPASSWORD: "randompassword"
      TZ: 'America/Los_Angeles' # pick your timezone
    restart: unless-stopped

networks:
  macvlan0:   # externally created network (later in article)
    external: true
Explanation of some docker file lines:
- We set the
container_name,image, andhostnameas usual - We have to specify a mac address so that the network binds work correctly later
- We add the
NET_ADMINcapability allows modification of network interfaces on the host system - we set a static
ipv4_addresson ourmacvlan0network (used later) - this is the address that will be your local DNS for your entire network - We manually set DNS on the host container to localhost, so that it uses the pihole resolver
- We expose all the pihole ports
- We set a few mandatory environment variables. IMPORTANT: make sure the
ServerIPvariable matches the static IP address you picked earlier.
Note: you'll also notice that we reference an external network called macvlan0, rather than include a section like this that defines a network in the docker-compose file:
networks:
  pihole_network:
    driver: macvlan
    driver_opts:
      parent: eth0
    ipam:
      config:
        - subnet: 10.0.37.9/24
          gateway: 10.0.37.1
          ip_range: 10.0.37.59/28
This would be a decent solution if you only use one container, but for better maintainability it's recommended to create the macvlan network externally, and simply connect the container to it by setting
networks:
  macvlan0:
    external: true
This will ensure that your network doesn't disappear when you run a docker-compose down, since that would break the startup scripts defined below.
Note: hold off on running docker-compose up -d, since we still need to create our network.
Create the macvlan network
As mentioned above, we'll want to create the docker network manually:
docker network create -d macvlan \
    --subnet=10.0.37.9/24 --gateway=10.0.37.1 \
    --ip-range 10.0.37.59/28 \
    -o parent=eth0 \
    --aux-address="myserver=10.0.37.60" \
    macvlan0
Here's an explanation of the flags:
-dsets thedriver, which in this case is macvlan--subnetaddress of your local subnet. Take the IP of your server, and add the/24flag on it so that the range is set from.1to.254--gatewayis the IP of your local router, so that the docker container can dial out to the internet-osets driver specific options. In this case, we are informing themacvlandriver to use theeth0parent interface. This should be set to the same physical interface that your server uses for the physical IP.--aux-addressdefines a reserved address in this new network. This ensures that no docker container gets assigned this IP, as it would cause a network collision. You must pick an address that is within the macvlan ip range.--ip-rangeis the most important command here. See below for an explanation of how to set this
Note: ip-range should be:
- A subsection of your main local network (so inside the subnet). In this case, the IP range is
10.0.37.59/28, which expands to10.0.37.49-10.0.37.62 - The
--aux-addressshould be present inside the ip range, so in this case we picked10.0.37.60
Enable docker to host communication over macvlan
By default, docker will connect the guest containers directly to the local network. Per the Docker Documentation:
In Macvlan you are not able to ping or communicate with the default namespace IP address. For example, if you create a container and try to ping the Docker host’s eth0 it will not work. That traffic is explicitly filtered by the kernel modules themselves to offer additional provider isolation and security.However, it is possible to set up a macvlan-shim network that will solve this issue for us.
First, we enable promiscuous mode on our parent interface: sudo ip link set eth0 promisc on
Explanation: Normally, only packets destined for the interface mac address are accepted. With promiscuous mode, we allow the capture of all packets, which then may or may not get matched by our various virtual macs.
Second, we create a new network: sudo ip link add macvlan-shim link eth0 type macvlan mode bridge
Explanation: Theip link addadds a virtual link calledmacvlan-shim. This network islinked to the parent interfaceeth0(the physical interface on your machine), with thetypeset tomacvlanand the mode set tobridge. Note that there are various types and modes that are available in theip link adddirective, but we don't need them for our purposes.
Third, assign an IP and the network space to the new network: sudo ip addr add 10.0.37.60/28 dev macvlan-shim
Explanation: This is an INCREDIBLY DELICATE step. The IP address (10.0.37.60MUST match the--aux-addressyou picked above, and MUST be inside the macvlan ip range. This is the most common cause of problems. If you can't ping your host from the container, this is probably why. Triple check this command!
Fourth, we must bring up the network: sudo ip link set macvlan-shim up
And finally, let's inspect the network: ifconfig macvlan-shim
You should see something like this:
macvlan-shim: flags=4163<UP,BROADCAST,RUNNING,MULTICAST>  mtu 1500
        inet 10.0.37.60  netmask 255.255.255.240  broadcast 0.0.0.0
        inet6 fe80::aaaa:cccc:ffff:3ed2  prefixlen 64  scopeid 0x20<link>
        ether de:ad:be:ef:ff:d3  txqueuelen 1000  (Ethernet)
        RX packets 13038592  bytes 3457466227 (3.4 GB)
        RX errors 0  dropped 0  overruns 0  frame 0
        TX packets 9661978  bytes 553397126 (553.3 MB)
        TX errors 0  dropped 0 overruns 0  carrier 0  collisions 0
Note that the inet address matches the --aux-address we picked above. This means that your server now has a second IP, which is INSIDE the subnet range for your docker macvlan network. Note also that the netmask is 255.255.255.240, which translates to the /28 bits of freedom that we assigned in our ip addr add command. If you don't understand this, read the basics of subnets. The TLDR is that out of 32 bits in a network, we lock 28 bits, which leaves 4 bits free. 2^4 = 16, so 256 - 16 = 240, which is the last number in the netmask string. For a better understanding of how subnets work, check out this useful resource over at https://www.pcwdld.com/subnet-mask-cheat-sheet-guide.
Test our new network by starting up and shelling into your container, then running a ping:
# start up our pihole
docker-compose up -d

# run a ping
docker exec -ti pihole-vlan ping -c 4 10.0.37.60
Where 10.0.37.60 is replaced by your server's macvlan injected IP address. If all goes well, you should see the usual ping output:
PING 10.0.37.60 (10.0.37.60) 56(84) bytes of data.
64 bytes from 10.0.37.60: icmp_seq=1 ttl=64 time=0.045 ms
64 bytes from 10.0.37.60: icmp_seq=2 ttl=64 time=0.072 ms
Persisting the macvlan network settings
If we don't persist these settings, the system network definition will be lost upon the next reboot. This will cause incredibly slow DNS lookups that time out, since there is no route to our pihole instance. If your DNS is very slow, this is likely the cause. Luckily, this is easy to solve.
First, make a script with the commands we used above to create the network. Save it to /usr/local/bin/pi-vlan.sh, and be sure to run chmod +x /usr/local/bin/pi-vlan.sh
#!/usr/bin/env bash
ip link add macvlan-shim link eth0 type macvlan mode bridge
ip addr add 10.0.37.60/28 dev macvlan-shim
ip link set macvlan-shim up
ifconfig macvlan-shim
Now, add a systemd file at /etc/systemd/system/pi-vlan.service with the following contents:
[Unit]
After=network.target

[Service]
ExecStart=/usr/local/bin/pi-vlan.sh

[Install]
WantedBy=default.target
And enable it so that it starts on boot: sudo systemctl enable pi-vlan
This script will wait until the network module comes up, and then add the macvlan-shim network for our pihole.
You can test this by rebooting your server. The docker container should come up since we set restart: unless-stopped, and the network shim should be added by our systemd script. You can run the ping check from above to verify everything works.
Enjoy!
There you have it! We've set up a pihole docker container, created a docker macvlan network for it, added a macvlan-shim system network for host access, and created a systemd script to persist these settings upon reboot. You can now go and enjoy your pihole!