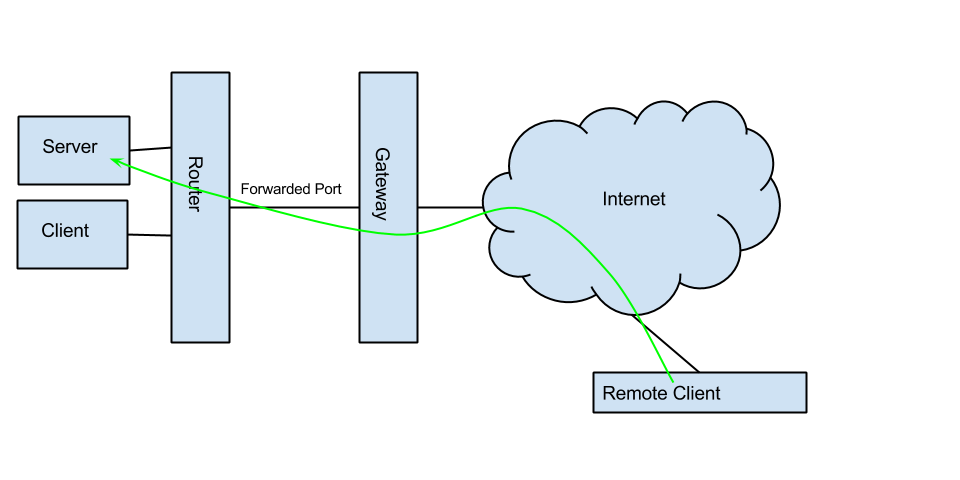
I often find myself in the position of wanting to access my computer remotely, be it to grab a file, check the status of a download, or to show off a cool project. However, my network is set up behind multiple routers and firewalls not under my control, so most traditional means of access are not available to me. I could try setting up a plethora of services to work in conjunction, such as a reverse SSH tunnel, TeamViewer, and a bunch of other utilities, but I decided to keep it simple and configure a VPN. The problem is, in order for a VPN to work, I need to have port forwarding set up all the way through our convoluted local network. This poses a problem for me for two main reasons: our local sysadmin doesn't know any of the passwords to the routers, and this would open up a security vulnerability in our network.
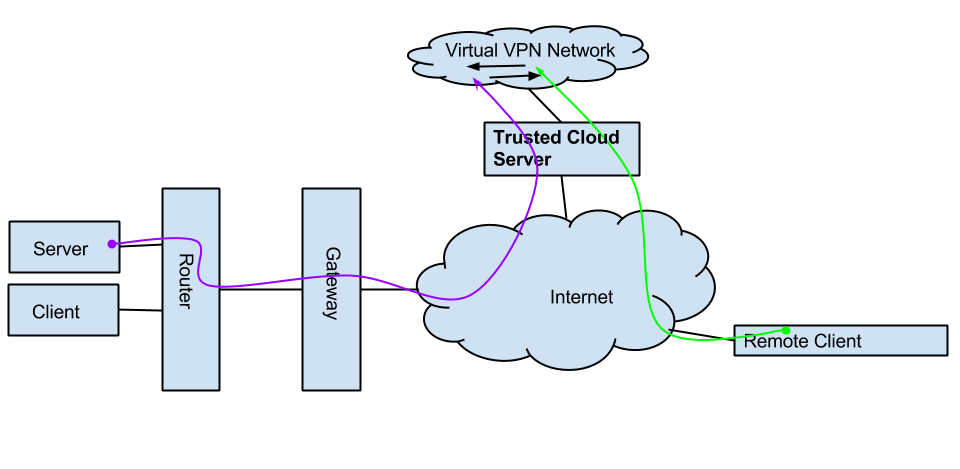
Given these considerations, I decided that the best course of actions is to configure a server in the cloud, with my local personal server connecting as a client, and then becoming a server to the other peripheral clients connected to that same cloud. Take a look at the diagram to see what I mean:
Traditional VPN:

Trusted Cloud Server:

One might ask, why set up my own VPN when there are so many services out there? The thing is, all of these services cost money, impose bandwidth limitations, limit the number of concurrent connections, often only support password authentication, and also enable client isolation, so my server and client would not be able to see each other. In addition, given the state of today's world, I prefer to keep as much of my data under my personal control as possible...
My requirements for the software were thus:
- The software must be free
- Support for layer 2 connections, so that Samba/Plex/Http and other multiport protocols work
- Certificate authentication for road warrior devices
- Ease of configuration and maintainability
What Technology is Used and Why
Initially, I wanted to set up a SoftEther server on my digital ocean droplet, and have all the different devices connect over whatever protocol was most convenient (ie, Android using L2TP, Ubuntu using OpenVPN, etc). However, turns out SoftEther does not support certificate authentication for both OpenVPN and L2TP/IPSec (even if you compile with the isRestricted() check removed). I then tried setting up OpenVPN, but turns out on Android devices the layer 2 (tap) drivers are not enabled, so I would have plex/samba broken on me. I then considered setting up a pure ipsec solution, as per this tutorial. However, racoon was giving me odd errors and seemed to be forcing XAUTH and IKEv1. After further research, I found that the project is actually quite outdated and even slated for removal from various repos. Ultimately, I came to StrongSwan 5.0. It has TONS of documentation, and most importantly, various sample config files.
If this is something you are interested in doing for yourself, read on for a relatively detailed tutorial. Otherwise, feel free to check out my other articles.
Basic Prerequisites
I'm glad you decided to give this a spin. You'll need several things to pull this off:
- Experience with the command line. If the sight of a terminal makes you nervous, I applaud your bravery for getting this far, and invite you to explore some intro articles about linux.
- Cloud hosted VPS. You will need root access, so you NEED your own server. I suggest Digital Ocean.
- A local server or desktop - this is the device you will be remotely connecting to.
- A laptop, phone, or tablet which will be your "road warrior", from which you will connect to your server or desktop.
Ready? Begin!
Server Creation
Log in to your cloud VPS, and get root access. You will perform the following steps:
- Install Strongswan (I'm assuming you are running Ubuntu)
- Configure Strongswan (steps are based on this tutorial: https://www.zeitgeist.se/2013/11/22/strongswan-howto-create-your-own-vpn/)
- Generate client certificates
Note: Be sure to change "SmirnovLabs" to whatever you would like to name your certificate authority.
apt-get install strongswan
ipsec version # verify that > 5.0

# generate root CA
cd /etc/ipsec.d/
ipsec pki --gen --type rsa --size 4096 \
	--outform pem \
	> private/strongswanKey.pem
chmod 400 private/strongswanKey.pem
ipsec pki --self --ca --lifetime 3650 \
	--in private/strongswanKey.pem --type rsa \
	--dn "C=US, O=SmirnovLabs, CN=SmirnovLabs Root CA" \ # CHANGE THIS NAME!
	--outform pem \
	> cacerts/strongswanCert.pem

# create host certificate
cd /etc/ipsec.d/
ipsec pki --gen --type rsa --size 2048 \
	--outform pem \
	> private/vpnHostKey.pem
chmod 400 private/vpnHostKey.pem
ipsec pki --pub --in private/vpnHostKey.pem --type rsa | \
	ipsec pki --issue --lifetime 3650 \
	--cacert cacerts/strongswanCert.pem \
	--cakey private/strongswanKey.pem \
	--dn "C=US, O=SmirnovLabs, CN=vpn.servername.tld" \ # NOTE!! - CN must be FQDN (Fully Qualified Domain Name) of vpn server
	--san vpn.servername.tl \ # CHANGE THIS VALUE TO MATCH THE ONE ABOVE
	--flag serverAuth --flag ikeIntermediate \
	--outform pem > certs/vpnHostCert.pem
Once this is done, you need to configure your server to match your needs. I'm including a sample of my config, but I urge you to explore the Strongswan documentation and samples to see what other options exist. Be sure to read through my sample config line by line and change any lines as needed.
# /etc/ipsec.conf - strongSwan IPsec configuration file

config setup
	charondebug="cfg 2, dmn 2, ike 2, net 2"

# default config, inherited by all others
conn %default
	auto=add

	# key and renewal settings
	ikelifetime=60m
	keylife=20m
	rekeymargin=3m
	keyingtries=1
	keyexchange=ikev2

	# various keepalive settings
	dpdaction=clear
	dpddelay=300s

	# server settings
	left=xxx.yyy.zzz.qqq # THIS IS THE IP OF YOUR VPN SERVER
	leftfirewall=yes
	leftsubnet=10.31.0.0/8 # PICK A SUBNET. You don't have to change this.
	leftcert=vpnHostCert.pem

	# client settings
	right=%any
	rightdns=10.31.0.1,8.8.8.8,8.8.4.4 # NOTICE THE FIRST IP IS THE LOCAL DNS SERVER
	rightsourceip = 10.31.0.0/8
	rightfirewall=yes

conn localserver
	rightsourceip = 10.31.0.1
	rightcert=LocalServerCert.pem

conn phone
	rightsourceip = 10.31.0.2
	rightcert=PhoneCert.pem

conn tablet
	rightsourceip = 10.37.0.3
	rightcert=TabletCert.pem
If you decide to edit this config file, be warned that there are some common pitfalls I encountered while building this myself.
- When modifying the config, be SURE to use
ipsec restartrather thanipsec reload, since newly defined acceptable certificates are not actually loaded when using the second command. - check for consistent indentation in the config file (spaces vs tabs). If you get a
/etc/ipsec.conf: syntax error, unexpected FIRST_SPACES [ ]when restarting your server try using the commandunexpand -t 4to convert all tabs to spaces. Remember,/var/log/syslogis your friend
Now, you'll need to generate certificates and p12 file for each client. A p12 file contains within it the private key of your client, its certificate, and the certificate of the server (to make sure you are connecting to your VPN and not a hacker's).
I wrote a little script to help you do this, since it's quite tedious to do by hand. The usage is simple: ./certificate_generator.sh ClientName. Note that you'll need to change the Root CA name to match the values you used in creating the server above.
#!/bin/bash

if [ -f private/${NAME}Key.pem ];
then
  echo "private/${NAME}Key.pem exists"
    exit 1
fi

NAME=$1
ROOT_CA="SmirnovLabs Root CA"

echo "Making client package for $NAME"

cd /etc/ipsec.d/

echo "- generating rsa key"
ipsec pki --gen --type rsa --size 2048 \
	--outform pem \
	> private/${NAME}Key.pem

echo "- making keys"
ipsec pki --pub --in private/${NAME}Key.pem --type rsa | \
	ipsec pki --issue --lifetime 3650 \
	--cacert cacerts/strongswanCert.pem \
	--cakey private/strongswanKey.pem \
	--dn "C=US, O=SmirnovLabs, CN=${NAME}" \
	--san ${NAME} \
	--outform pem > certs/${NAME}Cert.pem

echo "- making p12:"

openssl pkcs12 -export -inkey private/${NAME}Key.pem \
	-in certs/${NAME}Cert.pem -name "${NAME} VPN Certificate" \
	-certfile cacerts/strongswanCert.pem -caname "${ROOT_CA}" \
	-out ${NAME}.p12

echo "done! file name is ${NAME}.p12"
Save this script on your server somewhere, and run it for every client you wish to use. For your convenience, I've uploaded it as a gist.
Configuring Your Clients
My laptop and server both run Ubuntu, so I simply installed strongswan from apt-get, (making sure the version is 5.1+), and copied over the client keys from the cloud server. You'll need to copy your ClientKey.pem file to /etc/ipsec.d/private, ClientCert.pem to /etc/ipsec.d/certs, vpnHostCert.pem to /etc/ipsec.d/certs, and strongSwanCert.pem to /etc/ipsec.d/cacerts. In your /etc/ipsec.secrets, add the line : RSA ClientKey.pem. Naturally, if your client is not called Client, you'll need to modify the names accordingly.
Now, you need to configure your client to connect to your cloud server.
/etc/ipsec.conf # ipsec.conf - strongSwan IPsec configuration file

config setup
    charondebug="cfg 2, dmn 2, ike 2, net 2"

conn %default
    auto=add

    # key and renewal settings
    ikelifetime=60m
    keylife=20m
    rekeymargin=3m
    keyingtries=1
    keyexchange=ikev2

    # various keepalive settings
    dpdaction=clear
    dpddelay=300s

conn remote
    auto=start # starts on boot. Change to "add" to manually connect

  	# local config
    leftcert=ClientCert.pem
    leftfirewall=yes
    leftsourceip=10.31.0.1 # change this as needed. you might even not need this line

    # remote server
    rightcert=vpnHostCert.pem
    right=xxx.yyy.zzz.qqq # THE IP OF YOUR SERVER
    rightsubnet=10.1.0.0/8 # SAME AS SERVER CONFIG
For non Ubuntu clients, I refer you to the official Strongswan installation instructions.
Android Config
Getting this set up on Android is very easy - simply download your p12 file, click on it and import it. Then, download the StrongSwan Android App and fire it up. Pick "IPSec2 RSA" as the authentication method. You can also optionally uncheck the "Select Automatically" box under Ca Certificate, and pick your user defined CA. This will speed up the establishment of the connection.
DNS Configuration
You'll notice that once your clients remote in, they can only ping each other by IP. Many of my personal services depend on host names, so I set up a DNS server on my personal server, and changed the cloud server ipsec.conf to push that IP address to my other clients. I used dnsmasqd (apt-get install dnsmasqd; ), and edited /etc/hosts on my local server with the VPN IP mappings. This solution works, but it does mean that when my local server is connected to the VPN, it will be unable to ping my local clients by hostname. This isn't a big issue for me, but do be warned.
Additional Notes
- The way I configured the VPN, all traffic to the 10.31.0.0/8 subnet will be routed through it, while everything else will be sent along the regular interface. This allows my remote clients to communicate as if they were local ( see forwarding and split tunneling). However, this does mean that on the off chance that the local subnet is 10.31.0.0, clients will likely lose internet access.
- I had to upgrade my local ubuntu server to 14.04 in order to get strongswan 5.1.2 installed. I tried compiling from source and manually installing, but it was so much trouble upgrading my OS was easier.
- I enabled auto connecting to the VPN from my local server, so that the connection comes up on boot. On laptop devices, I changed it back to manual.
Enjoy
Congratulations! You now have a working VPN that is completely under your control, encrypted with the private and public keys. Your server supports logging, so you can see who is connected at any time, and you can easily add and remove clients using your PKI.